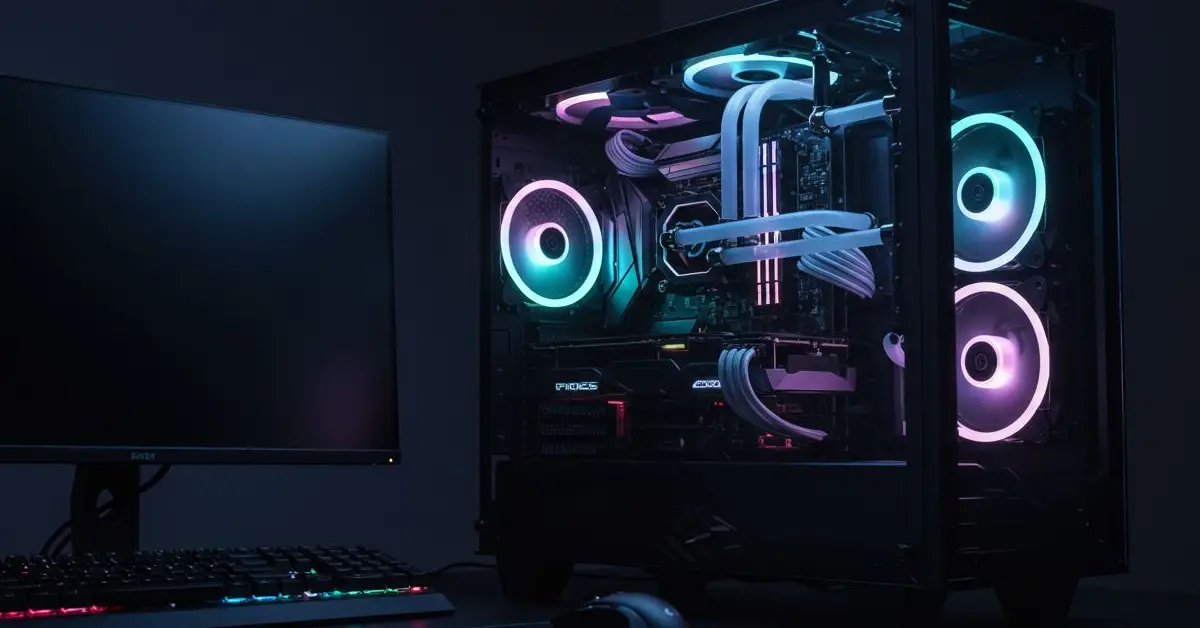
Overclocking is increasing the speed of PC hardware such as CPU, GPU, or RAM to improve the gaming performance. It is the cost-effective way to gain higher FPS in games without upgrading your PC. Overclocking requires a compatible motherboard, unlocked CPU, high-end cooling, and uninterrupted power supply. The process of overclocking includes entering th BIOS/UEFI and adjusting CPU core ratio, multiplier, and core voltage. Safe overclocking requires monitoring hardware temperatures to prevent overheating and system instability issues. In this guide, you will learn about how to overclock a gaming PC and risks associated with it.
What is Overclocking?
Overclocking means to increase the clock speed of PC hardware beyond the default clock speed. Overclocking can provide higher frames per second (FPS) in games, yielding smoother and immersive gaming performance.
In another definition, Overclocking is the process of running a computer component, most commonly the CPU or GPU at a higher clock speed than the default (factor set) clock speed to gain extra performance. This is done by increasing the operating frequency (measured in GHz for CPUs) and often adjusting the voltage supplied to the chip so it can maintain stability at the higher speed.
Which Components Are Essential for Overclocking a Gaming PC?
To effectively overclock your gaming PC, consider the following essential hardware components.
1. Unlocked Processor:
A CPU must be unlocked in order to be overclocked, as locked processors have their clock multiplier restricted by the manufacturer. Overclocking involves increasing the CPU’s clock speed beyond its factory-rated frequency to gain extra performance, particularly in tasks like gaming, rendering, or scientific computation.
Intel CPUs that support overclocking are designated with a “K” or “KF” suffix (e.g., Intel Core i9-9900K). AMD CPUs, especially modern Ryzen processors, are generally unlocked across the entire product line, from Ryzen 3 to Ryzen. AMD also provides tools like Precision Boost Overdrive (PBO) and Curve Optimizer, which allow automatic or fine-tuned overclocking based on voltage and thermal headroom.
2. Compatible Motherboard:
A motherboard is one of the most important components for overclocking because it determines whether the CPU can be pushed beyond stock limits and how stable that performance will be. Only certain chipsets support overclocking such as Intel’s Z-series boards and AMD’s B- and X-series options and the strength of a board’s VRMs (Voltage Regulator Modules) directly affects stability under high loads.
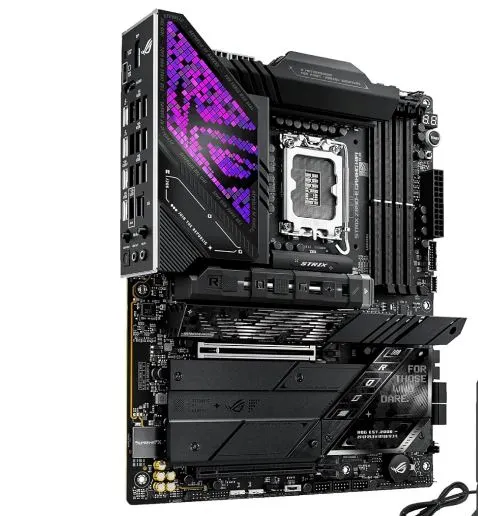
High-quality motherboards feature robust VRMs, efficient heatsinks, solid power connectors, and advanced BIOS controls to ensure stable power delivery to the CPU. Choosing a reliable, overclocking-ready motherboard with strong power delivery is essential for safe, stable, and effective CPU overclocking.
3. Efficient CPU Cooler:
Overclocking generates significant heat, which can damage your CPU if not managed properly. When you increase a processor’s clock speed and voltage to push performance beyond factory specifications, the CPU consumes more power. This additional power translates directly into higher thermal output.
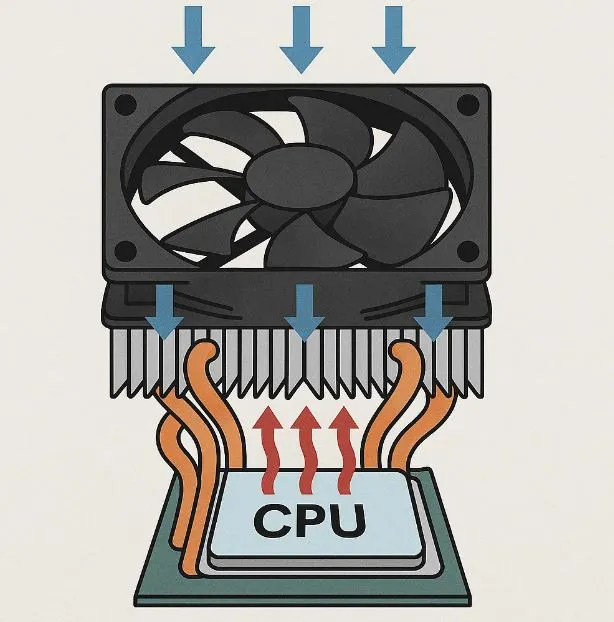
Modern CPUs from Intel and AMD are designed with built-in thermal protection mechanisms. For example, most processors have a Tjunction Max (maximum safe operating temperature), usually between 90 °C and 105 °C, depending on the model. Once this threshold is reached, the CPU will throttle its performance or shut down to avoid irreversible damage.
To dissipate the heat produced as a result of overclocking, it is essential to install an efficient cooling solution.
The most effective cooling options include:
- Custom Loop Water Cooling – Advanced setups with water blocks, radiators, and reservoirs provide maximum cooling potential for enthusiasts.
- Air Coolers – Large heatsinks with high-performance fans (e.g., Noctua NH-D15, be quiet! Dark Rock Pro 4) can handle moderate to high overclocks.
- All-in-One (AIO) Liquid Coolers – Closed-loop liquid cooling systems offer better thermal dissipation and are suitable for higher overclocks.
4. Adequate Power Supply:
A reliable PSU (Power Supply Unit) with adequate wattage is essential for stable power delivery during overclocking. When a CPU or GPU is overclocked, it draws more power than its default specifications require. This increased demand can strain the power supply if it lacks sufficient capacity or build quality, leading to instability, system crashes, or even hardware damage.
A high-quality PSU ensures clean, consistent, and efficient power delivery to all system components. Cheap or low-rated power supplies often suffer from voltage fluctuations, poor efficiency, or weak VRMs, which can cause sudden shutdowns or gradual wear on components. For overclocking, stability is as important as wattage.
Overclocking pushes hardware beyond standard limits, and only a well-built, properly rated PSU can ensure clean, uninterrupted power delivery, preventing crashes or component degradation.
What Are the Steps to Overclock a Gaming PC?
Before overclocking your PC, I highly advise you to record your CPU’s idle and load temperatures using monitoring tools like HWiNFO, Core Temp, HWMonitor, etc. This helps assess thermal headroom.
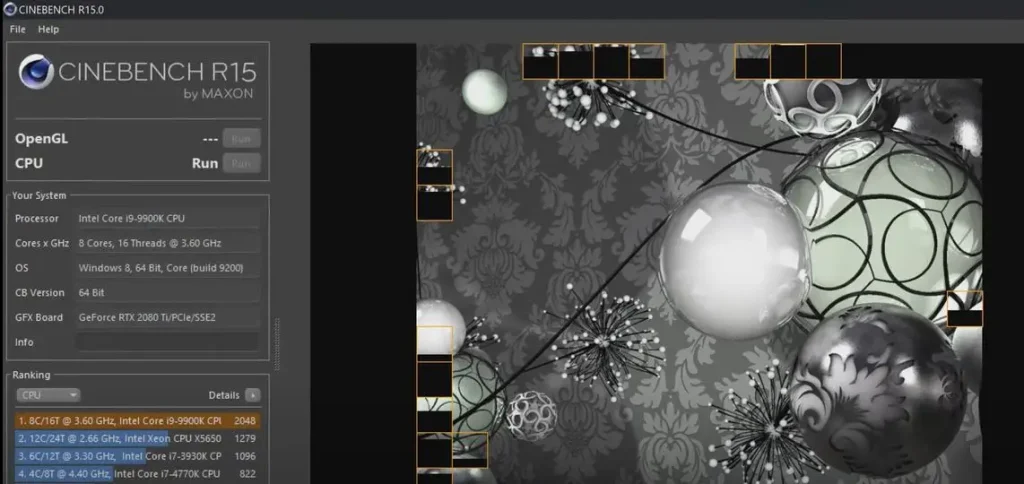
Use benchmarking software like Cinebench 15 to measure your CPU’s performance before overclocking it. Cinebench provides you with a benchmark score. You can compare this benchmark score with the one that you get after overclocking your PC.
Mentiond below are the four main steps to safely overclock a gaming PC.
Step 1: Enter BIOS
The first step to overclock your PC is to restart your machine and access the BIOS menu. To enter the BIOS menu, there’s a dedicated key on your keyboard. In most cases, it’s F2, F5, F10, or DEL button that helps you to enter the BIOS settings menu.
I’m using an ASUS motherboard, so I’ll be pressing the “DEL” key to enter into my system’s BIOS.
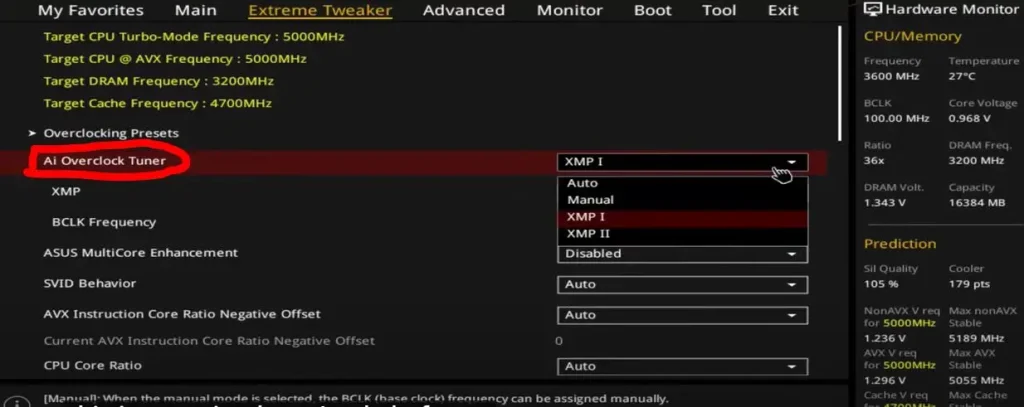
Step 2: Check RAM
Once you enter the BIOS, it’s time to see if your RAM is running at the best possible speed and setting. See the image above where I’ve selected the XMP 1 (which works best with Intel CPUs) as my preferred RAM setting.
Step 3: Tweak Settings
Once you are done with the RAM profile settings, it’s time to dive down and tweak the CPU settings. This is the section where you’ll find a lot of technical jargon, but there’s nothing to worry about. Most of these settings must be left at “Auto”.
Auto or Manual Overclocking
Depending upon your motherboard manufacturer, you’ll be asked to choose between manual or automatic overclocking. Choose automatic overclocking, if you want to stay away from technical jargon. However, automatic overclocking doesn’t offer you performance gains that manual overclocking does.
At this part, we’ll only interact with the settings that matter in the overclocking process.
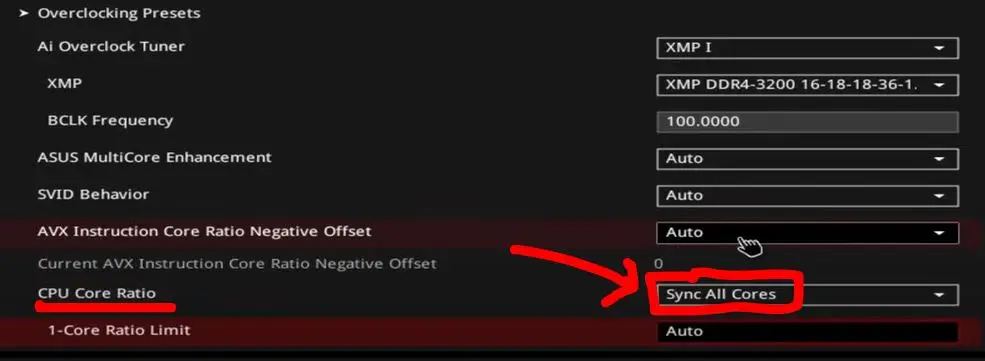
A: Select CPU Core Ratio
The first thing you need to change is the CPU Core Ratio. See the image above where I’ve changed this from “Auto” to “Sync all cores”. The reason for doing this is to max out all available cores on the CPU at the same clock speed.
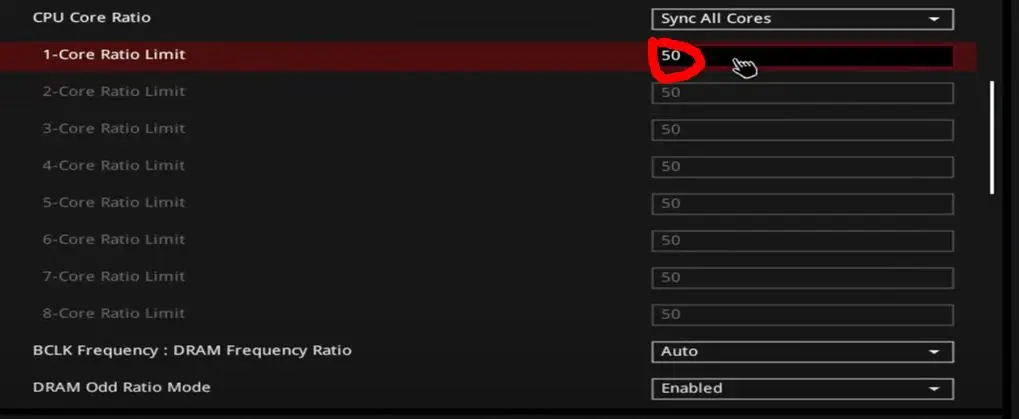
B: Adjust CPU Multiplier (Core Ratio)
This is the trickier part of overclocking where newbies get confused. However, by doing a little math, you can easily tackle this part.
The CPU multiplier determines the processor’s speed. Increase it incrementally (e.g., by 1x) to boost clock speed. For example, if your base clock is 100 MHz and the multiplier is set to 50, your CPU runs at 5.0 GHz.
C: Adjust CPU Core Voltage (VCore)
The last step in the overclocking is to manually adjust the CPU Core Voltage. See the image below where I’ve selected the Manual Mode and then set the voltage to 1.250V.
I highly advise you to start with a lower number. To support higher speeds, your CPU may require more voltage. Increase the Vcore cautiously, in small increments (e.g., 0.01 to 0.05 volts), to maintain stability without causing excessive heat.

Step 4: Save Changes
Save the modified settings in the BIOS/UEFI and restart your computer. Monitor the boot process for any issues.

Once your system boots into Windows, run the Cinebench benchmarks to see if your system is stable or crashes.
For instance, if your system crashes, restart it and enter the BIOS. Now, lower the CPU multiplier or increase the voltage.
Repeat the process until your system gets stable with the new settings.
Remember, overclocking carries inherent risks, including potential hardware damage and voided warranties. Therefore, proceed with caution, make incremental changes, and install high-end cooling to prevent your machine from frying up.
Is Overclocking safe?
Overclocking is a safe practice to adopt as modern PC hardware comes with built-in techt to shutdown to prevent heat damage. Latest generation CPUs, GPUs, and RAM modules are designed such that they withstand the high overclocking temperatures.
Though, advancement in technology has made overclocking safer as it was decade ago, your PC hardware is still exposed to risks of overclocking. The most overclocked hardware in a gaming PC is the “CPU”. Increasing the CPU voltage for longer period reduces its overall lifespan.
What Are the Risks of Overclocking a Gaming PC?
Below are the potential risks associated with overclocking a gaming PC:
- Overheating: One of the major risks of overclocking is overheating. Increase in power and voltage can cause your hardware (CPU or GPU) to overheat. Excessive heat can reduce the overall lifespan of a gaming PC. Always use high-end air or liquid CPU coolers for heat management.
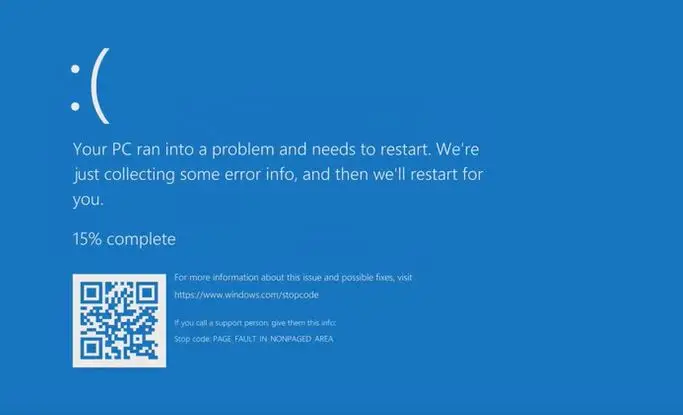
- Instability Issues: Lags, stutters, or freezes are common when you overclock your PC. Instability issues like these can cause data loss or BSOD errors.
- Void Warranty: Overclocking your PC means you are going beyond the speed limits set by the hardware manufacturer. While overclocking can increase your system’s performace, it also compromises the stability and lifespan of the hardware. Therefore, most manufacturers state that overclocking voids the warranty of the affected hardware.
Does Overclocking a CPU make it hotter?
Yes, overclocking a CPU makes it hotter as it increases the power and voltage to it. The higher the overclocking speed, the more heat a CPU produces. The increase in CPU temperature in the absesne of adequate cooling solution leads to instability issues like thermal throttling, freezes, or crashes.
How to fix issues caused by Overclocking?
To fix the issues caused by overclocking, follow the 4 steps mentioned below.
1. Conduct Stability Test: The first step to fix the problem casued by overclocking is to run the stability test. To do this, prefer stress-testing tools like Prime95, Cinebench, and 3DMark. Run the benchmark test to detect instability issues like errors, crashes, or freezes. These benchmarking tools allow you to find a stable spot for overclocking your PC.
2. Monitor Temperatures: Overclocking produces enormous heat, resulting in instability issues. The ideal safe operating temperature for modern CPUs and GPUs typically falls between 60 °C and 80 °C (140 °F to 176 °F) under heavy load. At these ranges, the components perform efficiently without significant risk of thermal throttling or long-term damage. Therefore, it is advisable to contantly monitor your temperature using tools like HWMonitor, CPU-Z, Hwinfo, and Core Temp.
3. Adjust Multiplier and Voltage: In most scenarios, overclocking instability issues arrise due to CPU multiplier and insufficient CPU voltage. Both of these settings are crucial and decide if overclocking has gone right or wrong. Increasing the CPU voltage and multiplier means CPU receives more power. Hence, high power increases the CPU temperature, causing instability issues. Lowering the CPU multiplie and voltage has proven to be the most effective fix for issues arrising due to overclocking.
4. Update BIOS/UEFI: In fewer cases, overclocking issues might be due to outdated BIOS/UEFI. Updating your BIOS may solve the instability issues caused by overclocking.
How to Know if Your PC is Overclocked?
To know if your PC is overclocked or not, follow the steps below:
- Press the CTRL + ALT + Delete buttons altogether to open up the “Task Manager“.
- Once in the Task Manager click o the “Performance” tab, and then select “CPU“. On the right side, you’ll see CPU speed in GHz. A CPU is overclocked if it’s running at a higher clock speed than the base (stock) clock speed.
Can I overclock my CPU?
The answer to this question depends upon whether your CPU is “Unlocked” for overclocking or not. An unlocked CPU is a processor with its clock multiplier left open by the manufacturer, allowing users to freely adjust the chip’s operating frequency beyond the default frequency. Intel identifies unlocked CPUs with a “K” or “KF” suffix (e.g., i7-13700K), while most AMD Ryzen processors come unlocked by default.
Why should I overclock my CPU?
You should overclock your CPU to acheive better performance in gaming and other high-demanding tasks like (4K video editing, 3D rendering, etc). Overclocking is the economical way to gain higher performance without spending money on upgrading your current PC.
Is it safe to auto overclock a CPU?
Yes, it is totally safe to auto overclock a CPU. An auto overclock is a feature offered by many modern CPUs and motherboards that automatically adjusts clock speeds and voltages based on system conditions, such as temperature headroom, power limits, and workload demand. Tools like Intel Turbo Boost, Intel Extreme Tuning Utility (XTU), or AMD Precision Boost Overdrive (PBO) automate the overclocking process, aiming to balance performance with safety by staying within manufacturer-defined thresholds.
What is the best software for overclocking a gaming PC?
The best software for overclocking a gaming PC in 2025 include, MSI Afterburner, EVGA Precision, and AMD Ryzen Master. Overall, MSI Afterburner remains the most reliable optinon for overclocking due to its reliability, versatility, and the active community support.
How to overclock a GPU?
Overclocking a GPU involves increasing its core clock speed and sometimes its memory clock to achieve higher performance in gaming or rendering. The process is straightforward but should be done carefully to avoid instability or overheating.
Below are the steps to safely overclock a GPU.
- Stress Test for Stability: Run extended gaming or benchmark sessions to confirm stable performance without crashes or visual glitches.
- Use Reliable Software : Tools like MSI Afterburner or EVGA Precision X1 allow you to adjust GPU clocks, voltages, and fan speeds.
- Increase in Small Steps: Raise the core clock by increments of 25–50 MHz and test stability with benchmarks (e.g., 3DMark, Unigine Heaven).
- Adjust Memory Clock: Gradually increase the memory clock for better VRAM performance, again testing for artifacts or crashes.
- Manage Cooling: Increase fan speeds or ensure sufficient case airflow; GPUs typically operate safely under 80–85 °C (176–185 °F).
Can I overclcock a gaming laptop?
Yes, you can overclock a gaming laptop, unless until it comes with adequate cooling solution. Modern gaming laptop are optimized by the manufacturer to perform better in gaming without overclocking. In theory, it is possible to overclock a laptop, but it is not recommeded because of limited cooling solution.

Mosaab Jamal Ahmed brings 12+ years of PC Hardware experience to the table. His journey began in 1998 with a Pentium 1 PC, igniting his lifelong fascination with computer hardware and video games. Over the years, Mosaab has honed his skills in upgrading and building gaming PCs. He has built dream gaming machines for multiple brands and local businesses throughout his career. Mosaab’s areas of expertise are building custom gaming PCs, in-depth PC hardware analysis, and PC hardware reviews.